CP-2000 Coolant Pump
Maintenance & Service Manual | Rev 2.4
Safety Precautions
Disconnect and lockout power before servicing. Ensure all capacitors are discharged. Contact with live components will result in severe injury or death.
Relieve all system pressure before disassembly. Hot coolant under pressure can cause severe burns.
Parts Diagram
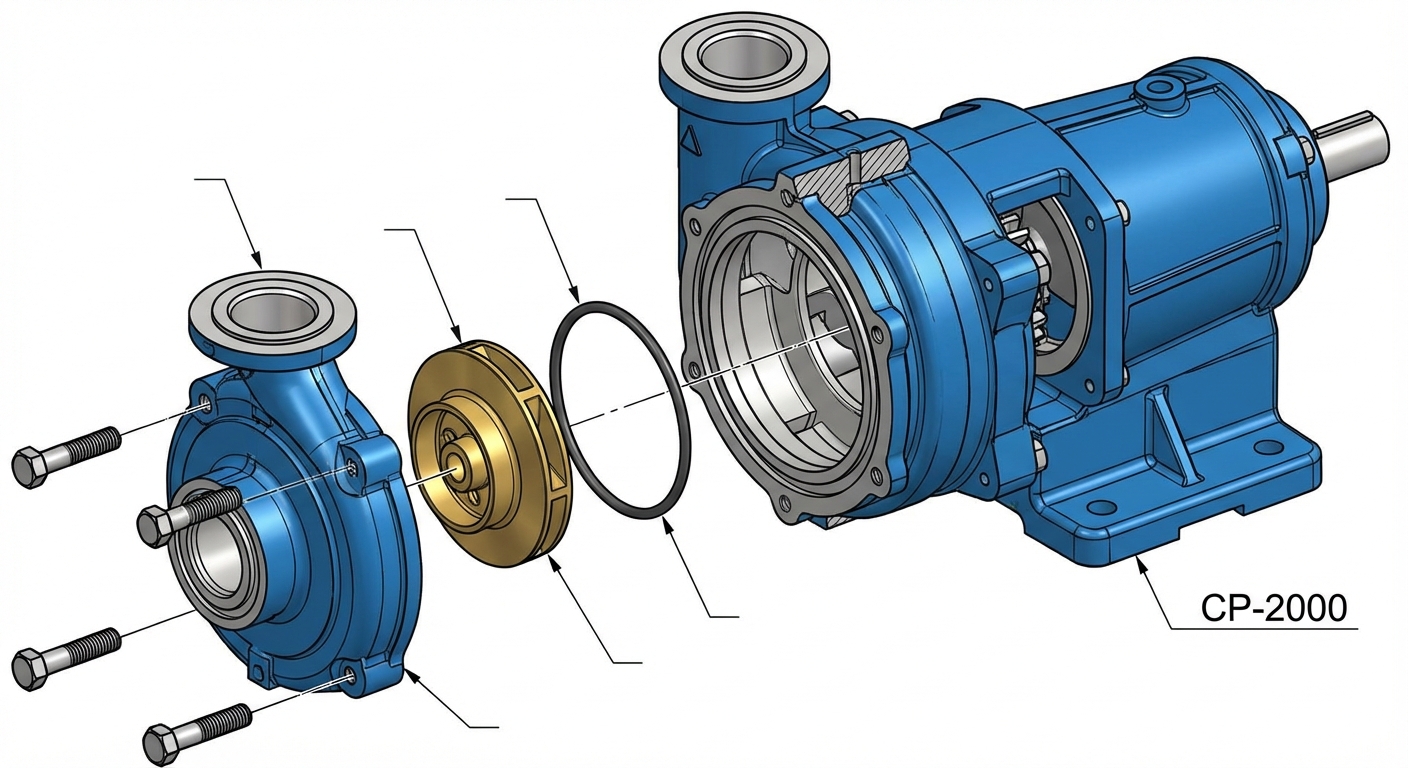
| ID | Component | Material |
|---|---|---|
MH-101 |
Motor Housing | Cast Iron |
FC-202 |
Front Casing | Stainless Steel |
IM-303 |
Impeller | Brass Alloy |
OR-404 |
O-Ring Seal | Viton |
Maintenance Procedure
Safety Check & Preparation
Ensure the unit is powered off and isolated. Verify zero pressure in the inlet/outlet lines. Clean the exterior of the pump to prevent debris from entering the housing during disassembly.
Remove Housing Bolts
Locate the four (4) M8 hex bolts securing the front casing to the motor housing. Using a 13mm socket wrench, loosen and remove the bolts in a cross pattern to prevent warping the casing.
Detach Front Casing
Gently tap the side of the front casing with a soft mallet to break the seal. Carefully pull the casing straight out to avoid damaging the internal components. Set the casing aside on a clean cloth.
Inspect Impeller
Visually inspect the brass impeller for signs of cavitation, erosion, or bent blades. Rotate the shaft by hand to ensure it turns freely without grinding. If the impeller is damaged, it must be replaced.
Check & Replace Seals
Remove the old O-ring seal from the groove. Clean the groove thoroughly. Inspect the new O-ring for defects. Lightly lubricate the new O-ring with silicone grease and install it into the groove.
Reassembly
Align the front casing with the motor housing. Insert the four hex bolts and hand-tighten. Torque the bolts to 25 Nm in a cross pattern. Reconnect power and test for leaks.
Troubleshooting
| Symptom | Possible Cause | Action |
|---|---|---|
| No Flow | Clogged impeller or air lock | Disassemble and clean / Bleed air |
| Loud Noise | Worn bearings or debris | Inspect impeller and bearings |
| Leaking | Damaged O-ring seal | Replace seal (See Step 05) |